Micro… What? How to use a Micrometer
June 20, 2016

Written By:
Sean Derrick | Product Development Engineer

Rookie Year: The Engineering Intern’s Toolbox (Part 2): A Series of Technical Blogs for Engineering Interns & Entry-Level Engineers
“What on earth is that thing?” asks everyone who sees a micrometer for the first time. Who can blame them as it looks like something from a medieval torture chamber. And it’s just as tricky to operate. “This thing takes three hands… and the numbers make no sense!” So, why then does every veteran machinist swear that a micrometer is the best tool in their toolbox?
A micrometer is a simple and precise way to take a measurement using a hand tool. It can easily and reliably measure objects to within 0.001 inches. Despite all of your negative thoughts, every engineer and machinist gets introduced to the micrometer. Often knowing how to use one is something most companies expect interns to already understand. Here’s a quick lesson on micrometers to help you stay ahead of the class.
1. What is a Micrometer?
A micrometer is a highly precise device for measuring various objects. It operates by measuring the space between a hard stop (anvil) and a movable surface (spindle). When a thimble is turned it drives the spindle closer or farther away from the anvil.
To take a measurement an object is placed between the anvil and the spindle and the thimble is spun until the object is gently pinched between the two faces. After the object is pinched the scale is read and a decimal measurement is derived. *For example, 0.165 inches or 4.19 mm
2. Anatomy of a Micrometer.
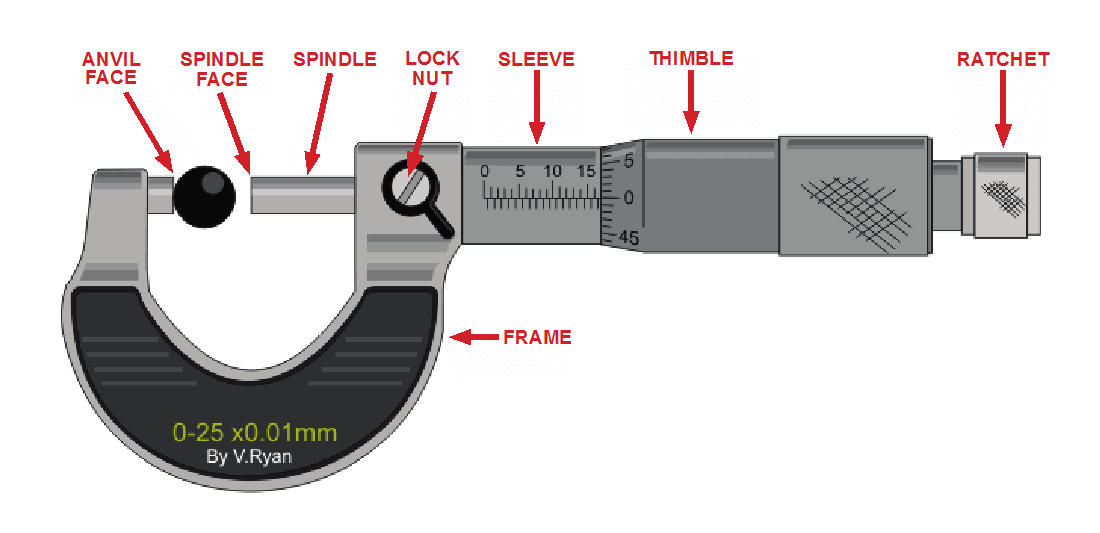
The basic anatomy of a micrometer is very simple. The frame of the micrometer houses all of the components that don’t move relative to the spindle. This includes the anvil, lock nut, and the sleeve. The anvil is a precision ground flat surface that acts as a reference.
The lock nut is simply a quarter turn nut that locks the spindle from turning. The sleeve contains the scale which is used to determine the measurement and the internal threads which allow the spindle to move.
The moving parts consist of the spindle, thimble, and ratchet. Like the anvil the spindle contains a precision ground measuring face on the flat of the cylinder.
The thimble acts like the head of a bolt. When you rotate the head it drives the bolt forward or backward. The Ratchet is a mechanism to insure that the spindle does not pinch the object too tightly leading to a false reading.
3. Holding a Micrometer.
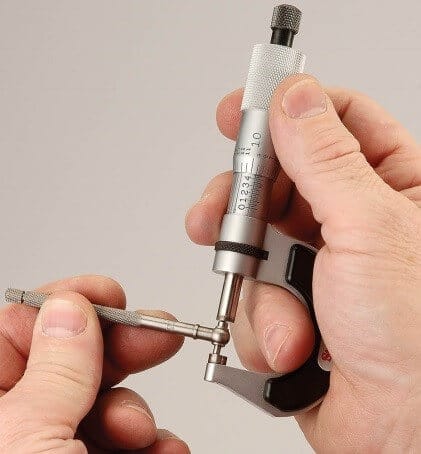
How you hold and use a micrometer will instantly tip a veteran off as to whether you know or don’t know what you are doing.
Rookies typically need a third hand and excessively fumble around in order to take a measurement. An old pro can use a micrometer in one hand and hold the item to be measured in the other, see Figure 3.
The proper way to use a micrometer is to hold it in your dominant hand. Grasp the thimble between your thumb and index fingers. Place the C-shape of the frame against your palm. Finally, partially wrap your pinky or ring finger within the inside of the frame. Hold the object to be measured in your non dominant hand.
Quick tips:
- Support the weight of the micrometer in your palm so you can twist the thimble or ratchet by rubbing your thumb and index fingers.
- Don’t insert your pinky or ring finger into the frame so much that you obstruct the object to be measured.
- Don’t cover the sleeve with your palm or you won’t be able to see the measurement.
4. The Micrometer Scale.
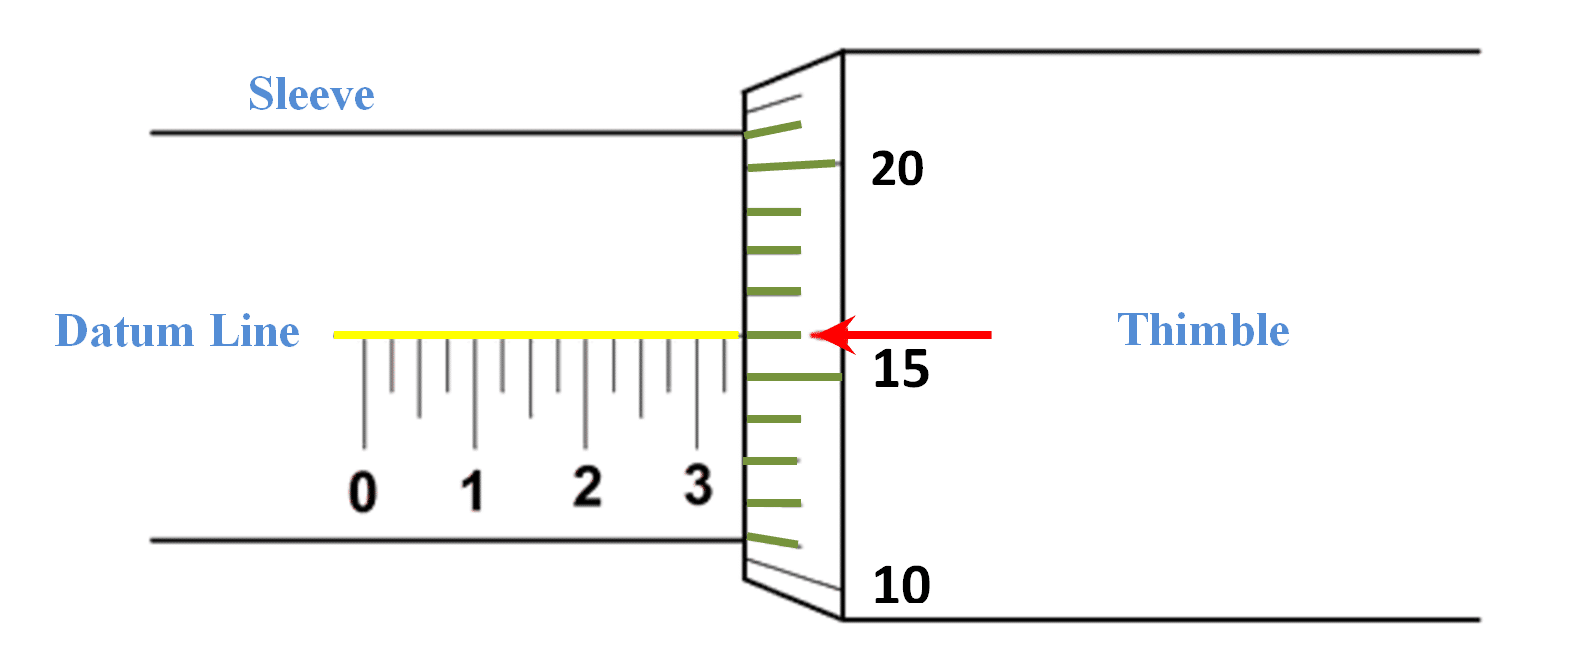
Engraved on the micrometer’s sleeve is a scale. This scale contains a long line the runs the entire length of the micrometer’s sleeve (datum line). In Figure 4 this line is highlighted in yellow. The numbers on the scale correspond with how far away the spindle is from the anvil.
The zero on the scale corresponds with the spindle touching the anvil (ie: zero distance between the surfaces). A micrometer is usually set up for either English or metric units only. On English micrometers each dash on this scale represents .025² (25 thousandths of an inch). The large numbers represent .100² (100 thousandths of an inch).
The spindle also contains a scale along its circumference, each of these lines are highlighted in green in Figure 4. Each line on this scale represents .001² (1 thousandth of an inch). There are 25 of these lines along the spindle.
As the spindle revolves it will reveal more or less of the datum line. One revolution of the spindle corresponds to .025² or one line on the datum line. Therefore, one revolution of the spindle will either reveal or hide one dash on the datum line.
5. Taking a Measurement.
To take a measurement on the micrometer the object is gently pinched between the anvil and spindle. Once a very gentle pinch has occurred the user twists the ratchet until it clicks once or twice. This ensures that the right amount of tension is applied.
The object should be held firm enough to not fall out of the micrometer under its own weight yet gentle enough that it can easily slip away if grasped. If necessary the user can apply the lock nut to prevent the spindle from tightening or loosening while interpreting the measurement.
6. Reading the Measurement.
The user then looks at the lines on the spindle and finds which markings are aligned with the datum line. This line, highlighted with the red arrow in Figure 4, is the measurement.
To interpret the measurement requires some mental math:
- Read the largest number shown on the datum line. In Figure 4, the 3 is still visible. This corresponds to .300 inches.
- Count the number of dashes on the datum line between the last large number and the spindle. In Figure 4, 1 line is visible and represents .025 inches.
- Read the number on the spindle that is aligned with the datum line. This is the line highlighted with the red arrow. As each line is equal to .001² the highlighted line in the picture is read as .016²
- Lastly, add these three numbers together to get the final measurement: Example: .300² + .025² + .016² = .341²
7. Sample Measurements.
