Removing a Stripped Screw with Confidence
November 17, 2016

Written By:
Sean Derrick | Product Development Engineer

Rookie Year: The Engineering Intern’s Toolbox (Part 6)
A Series of Technical Blogs for Engineering Interns & Entry-Level Engineers
Now you’ve done it! Your boss asked you to remove a few simple screws… and in the process, you mangle a screw head beyond repair. How on earth are you going to get it out now? Guess you’ll need to go to the boss and fess up that you broke it. You think to yourself, “I’m screwed.” A better option is to keep reading this article and learn a few tips that will help make it look like it never happened… or at least minimize your embarrassment.
Before we learn how to fix a stripped screw, let’s learn how to prevent stripping it in the first place. What causes a screw to strip? A screw strips when the screwdriver grinds away the drive features within the screw’s head. Once these features are worn away the screw cannot be driven out. The best way to not strip a screw head is to not let the driver spin without the screw turning with it. Let’s discuss a few ways to prevent or minimize the chance of stripping a screw.
4 Ways to Prevent Stripping a Screw Head
1. Use the correct driver.
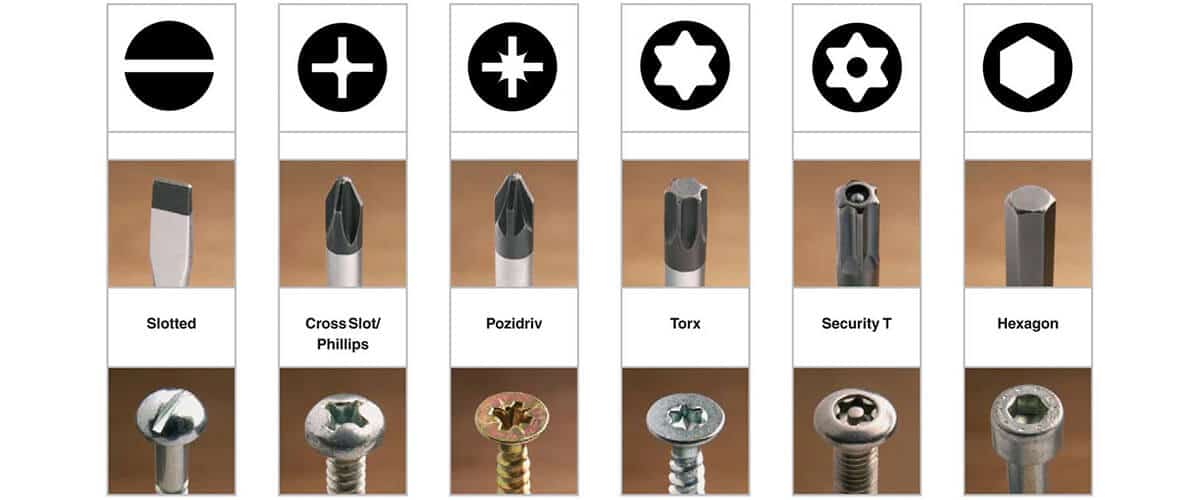
There are many different driver styles. Some of them even look alike. It can be tempting to cheat and use something fairly close such as using a Phillips in a Pozidrive or a Torx in a Hex. DON’T FALL VICTIM TO THIS TEMPTATION! As the old adage goes… use the right tool for the job.
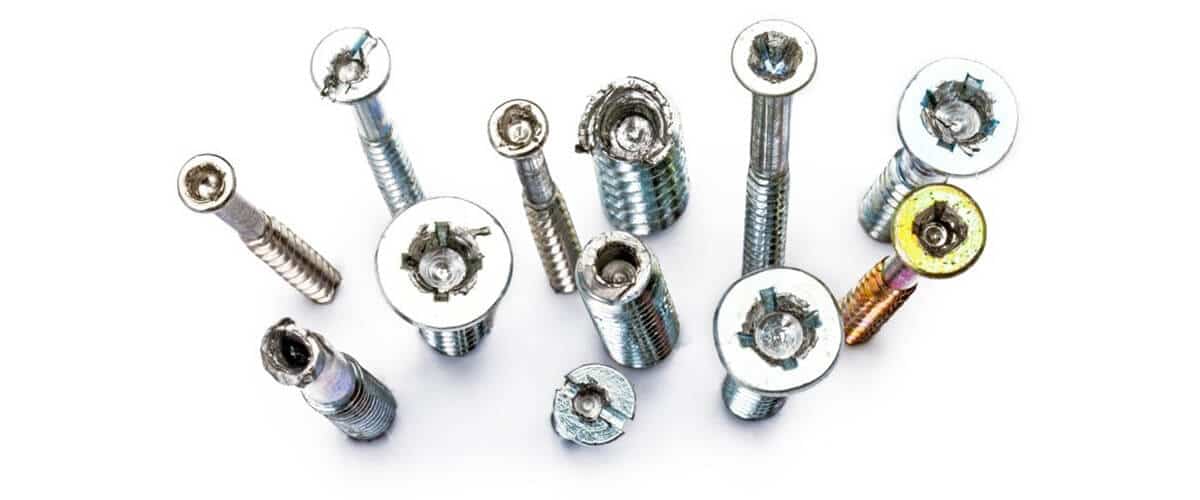
Using the right driver size is equally as important as using the right driver type to prevent stripping. The majority of stripped screws are due to using a driver which is too small for the head of the screw. As a result, the driver has more room to spin than it was ever intended. Using the wrong driver size is especially common with Phillips and flat head fasteners as the sizes of the fasteners are so close that most people just use whatever they grab first. An example can be seen in Figure 2.
2. Fully seat the driver before trying to drive the screw.
This is the number one reason why screws get stripped in the first place. The operator is either in a bad position or is simply in a hurry. As a result, the driver head is only partly in place and is allowed to spin freely. As it spins it grinds more and more of the fastener’s head away. This is especially true when using powered screw drivers. Make sure you seat the driver… THEN… drive the screw.
3. Use the right amount of power.
Typically screws are stripped because the driver head is not fully seated. However, when that is coupled with using too much power… the results are catastrophic. By the time you realize you have a problem there is a big problem to fix. Use only as much power as you can control. Either slow down the speed or reduce the amount of torque (how hard you spin the driver).
4. Do not force it.
If the fastener is stuck then don’t try to force it. Screws can rust in place, get pinched by material, or even have thread locker glue applied to them. If the screw doesn’t want to turn with little force then stop and evaluate before giving it the spurs. Otherwise, you might damage the drive for no reason. Sometimes stopping a moment to add some oil or heat is much faster than stopping to fix a stripped screw.
5 Ways to Remove a Stripped Fastener Head
At last we get to what you really wanted to know… before your boss finds out. Below are five techniques to remove a stripped screw head. The order they are presented in is the order I recommend depending on the situation. Each progressive technique risks damaging both the screw and the material around the screw. The further down the list you go… the greater the amount of stripping.
1. Use a rubber band.
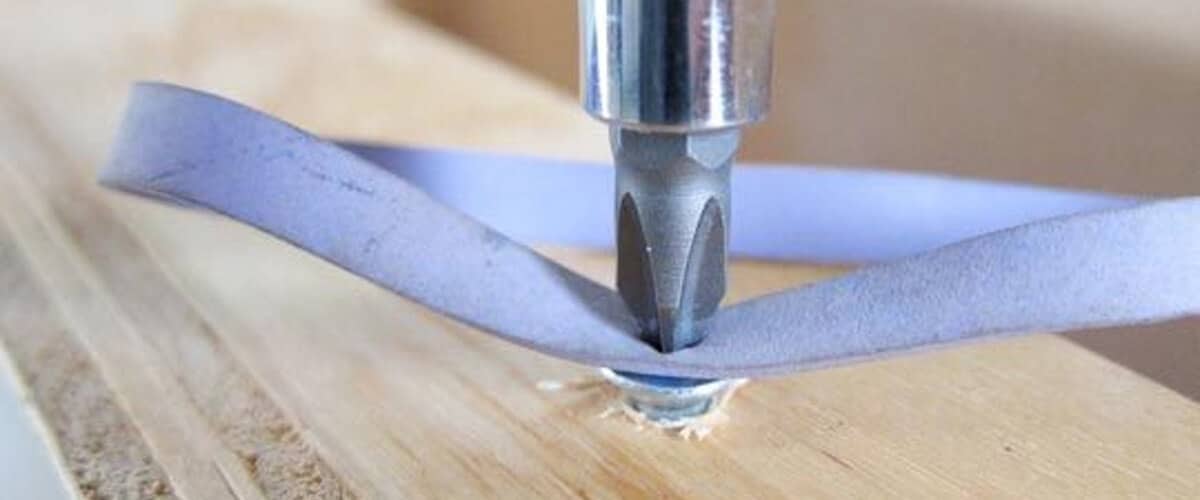
This trick works well when the fastener is small or only mildly stripped, such as on electronics or decorative furniture fasteners. First, select the correct driver size and style for the fastener. Next place a rubber band over top of the fastener’s head. Then press down firmly with the driver and back the fastener out slowly. The rubber band helps fill the gaps and give a more positive engagement for you to drive the screw. If you don’t have access to a rubber band then duct tape or thin cardboard will serve the same purpose.
2. Use pliers.
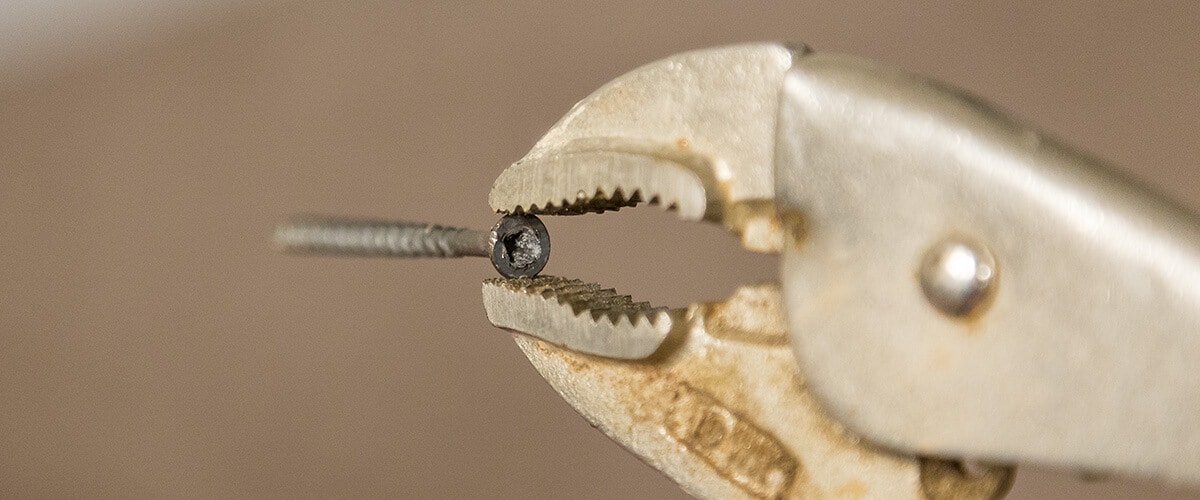
If the head of the fastener is fully exposed and there is little risk of breaking it off, use a pair of locking pliers (Vice Grips) to firmly grasp the screw head. The pliers should grab the screw so firmly that the head dents slightly. Gently use the pliers to spin the head of the fastener until loose enough to remove via your fingers.
3. Make it a different drive style.
This technique requires a little more abuse to the screw head. First, select a driver style and size which is close to the original but slightly larger. For example, if the driver style was a Philips select a slightly larger Philips. Place the slightly larger driver into the head of the fastener and tap with a hammer. You are attempting to indent the driver into the screw head to give yourself more screw engagement. Tap only hard enough to seat the driver and cause a slight dent within the head of the fastener. Afterward, press firmly and back out slowly.
If the thread is severely stripped this technique can work by using a slightly larger dissimilar driver style. A few examples would be using a slightly oversized Torx driver within a hex or a flat head within a Philips. The sharp edges of the flathead and Torx drivers will dent the fastener and “bite” in more tightly. WARNING: this technique may damage your driver. Use at your own risk.
4. Make it a flat head.

This trick is very straight forward and works practically every time if the head of the screw is exposed and intact. Use a Dremel, saw, or file to cut a small groove into the faster head. Once the groove is deep enough, use a standard flat head fastener to remove the screw. Just remember to press firmly with the driver and go slowly when removing. This technique will irreversibly damage the head of the fastener. If the groove is cut offset or the head of the fastener is too thin, you may risk breaking the head of the fastener. Additionally, you will run the risk of damaging the work surface.
5. Use a screw extractor.
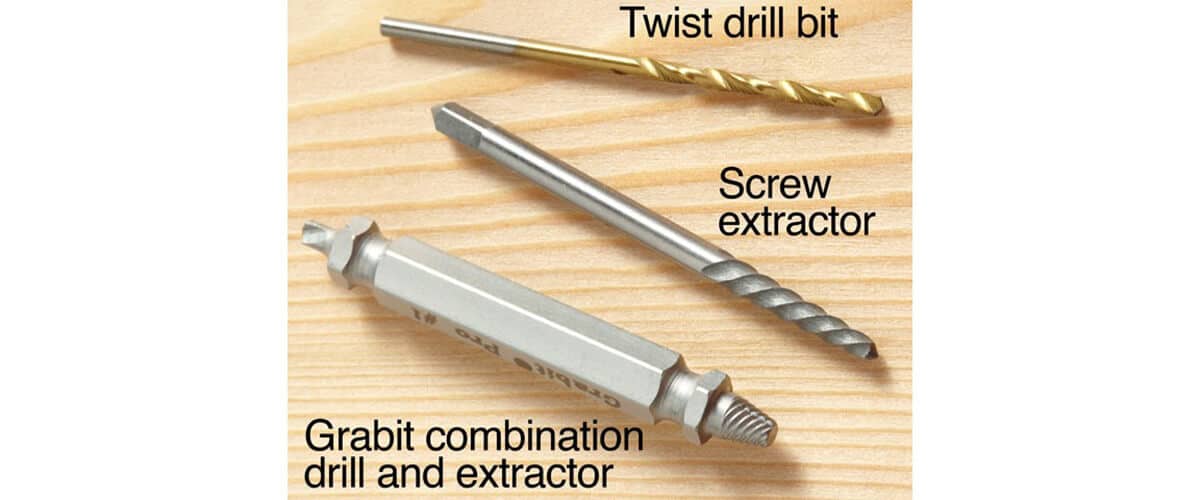
A screw extractor is a commercially made product for removing stripped screws. Two varieties of extractors are shown in Figure 6. First, the old driver head within the screw is drilled away. This can be done with a standard twist drill or drill provided on the opposite end of a combination extractor. After which the screw extractor is placed into the newly drilled hole. The extractor contains spiraling twists that turn counterclockwise. The extractor’s spirals act like the threads on the screw you are trying to remove. When the extractor is placed in the newly drilled hole and is spun counter-clockwise, the spirals want to grab the walls of the hole. This grabbing effect makes the stripped screw want to spin counter-clockwise and back out along with the extractor.
I typically save using screw extractors for my last attempt because they will permanently destroy what is left of the fasteners drive head. Likewise, they fundamentally weaken the fastener so that all of the other methods will no longer work. In essence, once you commit to a screw extractor it had better work or your options are limited.
Extra Tip: Never… ever… ever try to reuse a stripped fastener. Always replace the fastener with a new identical screw. Otherwise the next time you attempt to remove the screw it will be twice as difficult.
Written By: Sean Derrick – Product Development Engineer |
Sean has a B.S. in Engineering Design and a M.S. in Manufacturing Engineering from Western Michigan University. He has over 7 years of product development experience in a variety of industries ranging from medical, automotive, furniture, consumer products, and defense. Sean enjoys hiking, mountaineering, skiing, movies, and is pursuing a Ph.D in his free time.